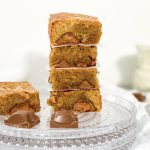
Salted Caramel Brown Butter Blondies
Melt in the mouth, light, yet rich and a little gooey on the inside, these Salted Caramel Brown Butter Blondies are studded with squares of Cadburys Caramel chocolate and topped with an extra sprinkling of sea salt. Using bars of chocolate caramel means these bars are exceedingly quick and easy to make with guaranteed nuggets of caramel joy in each mouthful!
Serves 9 – 16
Ingredients
- 200g unsalted butter, in cubes
- 150g soft brown sugar
- 50g caster sugar
- ¼ teaspoon fine salt
- 3 eggs
- 3 teaspoons vanilla paste or extract
- 140g plain/all-purpose flour
- 360g/3 bars Cadbury Dairy Milk Caramel Bars
- sea salt for sprinkling on the top
Instructions
-
Collect together your equipment (see Recipe Notes below) and ingredients.
-
Preheat oven to fan oven 160°C /180°C/350°F/Gas 4
-
First, brown the butter: chop the butter into squares and place in a saucepan. Heat over a moderate heat, stirring from time to time, until the butter turns brown. To read more about browning butter, please see here.
-
Pour into a jug so it stops cooking, cools and is ready to pour into the batter.
-
Make the blondie batter: meanwhile, put the sugars, eggs and salt into a mixing bowl and beat with an electric whisk until thick and creamy. This will take around 3 minutes.
-
When the eggs and sugar are ready, add the vanilla paste and slowly pour in the melted butter, at the side of the dish, and beat until completely incorporated.
-
Put a sieve over the bowl and add the flour and sift directly over the cake batter. Fold in but be careful not to over-mix at this stage.
-
Transfer half of the batter to your lined baking tin and level the surface, making sure the cake batter goes all the way into the corners.
-
Set 16 squares of Chocolate Caramel aside and evenly divide the rest over the surface of the blondie batter.
-
Top with the remaining cake batter, again levelling the surface and making sure the cake batter goes all the way into the corners.
-
Top the cake batter with the 16 Chocolate Caramel squares – I place a square roughly in the centre of each blondie.
-
Sprinkle a little sea salt over the top of each chocolate square. These will more than likely sink as you cook the blondies but you will find them again when you sink your teeth into the centre of each delicious slice!
-
Bake in the centre of a pre-heated oven for 28 – 32 minutes, depending on how squidgy you like the centre to be. (I cook mine for 30 minutes in London.) This gives me a slightly crispy top but a gorgeous gooey centre. The cake will be slightly risen but the centre will feel quite soft.
-
Leave to cool in the tin for around 30 minutes and then transfer, in the baking parchment, to a cooling rack.
-
When the blondies are cold, lay on a chopping board and cut into 16 slices.
Recipe Notes
Equipment:
- Microwave safe jug or heatproof bowl
- Electric whisk and mixing bowl
- Kitchen scales and measuring spoons
- Sieve
- chopping board and knife, if necessary
- 20cm/8inch square baking tin lined with baking parchment
Cooking times:
Bake in the centre of a pre-heated oven for 28 – 32 minutes, depending on how squidgy you like the centre to be. (I cook mine for 30 minutes in London.) This gives me a slightly crispy top but a gorgeous gooey centre. The cake will be slightly risen but the centre will feel quite soft. Remember the cake will continue to cook after you have taken it out of the oven. Ovens do vary so make a note of how long it takes to cook your favourite consistency in your oven. Remember the less you cook it, the more gooey it will be and the more you cook it, the more cake like it will be.
Slicing blondies:
If I have time and/or if I want my blondies to look really smart, I put my blondies in the fridge to harden before I cut them. You will get much better lines and edges – definitely do this if trying to impress or gifting/selling them! However, they are best eaten at room temperature and can be stored at room temperature, in a sealed container, for up to 5 days. I doubt, however, they will last that long!