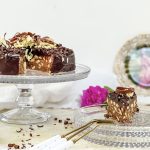
Chocolate Biscuit Cake
By royal appointment, I give you this delicious Chocolate Biscuit Cake. It is a favourite, not just of the Queen, but the whole royal household. Apparently, Prince William requested this recipe for one of the layers of his wedding cake!
Serves 8 - 10
Ingredients
For the cake -
- 115g dark chocolate - the recipe states minimum of 53% cocoa solids. I used 70% cocoa solids
- 225g Rich Tea Biscuits
- 115g unsalted butter, at room temperature
- 115g caster sugar
- ⅛ teaspoon fine salt
- 2 tablespoons spirit such as rum or use water. I used Frangelico. You could also use Kahlua, Cointreau, Grand Marnier or Amaretto, for example.
For the chocolate ganache -
- 125g dark chocolate, chopped (I used 70% cocoa solids)
- 125g whipping cream
- ⅛ - ¼ teaspoon fine salt, to taste
- chocolate curls - I like a mix of milk, plain and white chocolate
Instructions
-
Collect together your equipment (see Recipe Notes below) and ingredients.
-
Make the cake first - break the chocolate into squares and place in a microwave safe bowl. Melt in a microwave or a bain marie or and mix until smooth. (See Recipe Notes for details.) Set aside to cool.
-
Break or chop the biscuits into small pieces, around 1 - 2 cms in size. Do not use a food processor - you want pieces of biscuits, not crumbs.
-
Beat the butter, sugar and salt with an electric whisk, until light and fluffy.
-
Beat in the cooled melted chocolate and the stir in the rum/water/Frangelico or your drink of choice. You could also use Kahlua, Cointreau, Grand Marnier, Amaretto, for example.
-
Add the chopped biscuits and stir to mix thoroughly.
-
Tip into a greased and lined 18cm/7inch round cake tin. Press it carefully and firmly to ensure that the cake has an even texture throughout. Cover in cling film and place in the fridge to firm up for a minimum of an hour.
-
Make the ganache - break the chocolate into pieces and blitz in a food processor, until it resembles crumbs. Tip into a heatproof bowl.
-
Meanwhile, heat the cream until it starts to bubble on the surface; do not boil the cream.
-
Pour the hot cream onto the chocolate crumbs. Add the salt and stir until the chocolate has melted and the ganache is smooth and velvety.
-
Take the cake out of the cake tin and place, top side down, onto a wire rack. You may wish to place the rack over a baking tray for easy clean up.
-
Pour the ganache over the cake, letting it run down to cover the top and sides.
-
Use a potato peeler to create some chocolate curls - I like a mix of milk, plain and white chocolate. Scatter over the top of the cake.
-
Leave the ganache to set and then transfer onto a serving plate.
Recipe Notes
Equipment:
- kitchen scales and measuring spoons
- chopping board and knife
- electric whisk and mixing bowl
- greased and lined 18cm/7inch round cake tin
- small saucepan
- mini food processor
- mixing bowl
Be very careful melting the chocolate. Chocolate can be very difficult to work with. You can overheat it very easily and the mixture will go grainy. When this happens, there is no way to resolve it I’m afraid!
Microwave: I give the chocolate a minute in the microwave, take it out and stir it well, then let it sit for a few minutes to see if it continues melting sufficiently to melt all the chocolate. If not, I then continue with the microwave but in 10 – 15 second bursts.
Bain Marie: if you do not have a microwave, put the chocolate in a heatproof bowl over a saucepan of gently simmering water. Do not let the base of the bowl touch the water. Heat until the chocolate is very nearly melted then take it off the heat and take the bowl off the saucepan. Be very careful not to burn yourself as the bowl will be hot and steam will escape from the saucepan. Allow the mixture to sit for a few minutes for the residual heat to melt the remainder of the mixture. Again, be careful not to over-heat.